Table of Contents
It can be helpful to do certain types of yoga to alleviate lower back pain.
However, it’s essential to remember that every individual is different, and what works for one person may not work for another.
If you are experiencing lower back pain, you should consult a healthcare provider or a trained yoga instructor to determine the best course of action for you.
It’s also important to listen to your body and stop movements that cause pain or discomfort.
With that said, Yoga with lower back pain has proven to be very effective for many people, and therefore, we have compiled a list of five yoga poses you should try to fight your back pain:
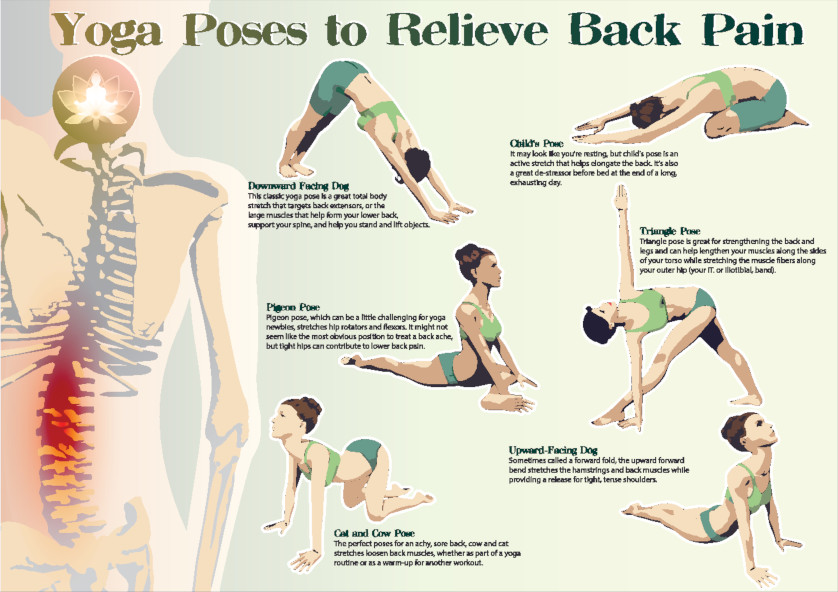
Child’s pose (Balasana)
This pose stretches the muscles in the lower back and hips. To come into child’s pose, start on your hands and knees with your wrists under your shoulders and your knees under your hips. As you exhale, bring your hips back towards your heels and lower your chest towards the floor. You can keep your arms extended in front of you or bring them alongside your body with your palms facing down. You can also place a pillow or blanket under your hips for added support. Hold this pose for 30 seconds to a minute, breathing deeply. To release the pose, bring your hips back to your heels and return to a hands-and-knees position.
Cat-cow pose (Marjaryasana-Bitilasana)
This pose helps to stretch and strengthen the back muscles. To start, come onto your hands and knees with your wrists under your shoulders and your knees under your hips. As you inhale, drop your belly towards the floor and lift your gaze towards the ceiling, creating an arch in your back (cow pose). As you exhale, round your spine towards the ceiling, tucking your chin towards your chest and bringing your navel towards your spine (cat pose). Continue to flow between these two poses, syncing your breath with the movement. This pose can also be modified by placing a pillow or blanket under your knees for added support.
Downward-facing dog (Adho Mukha Svanasana)
This pose stretches the muscles in the lower back, as well as the hamstrings and calves. To come into downward-facing dog, start on your hands and knees with your wrists under your shoulders and your knees under your hips. As you exhale, lift your knees away from the floor and straighten your legs, coming into an inverted “V” shape. Keep your feet hip-width distance apart and your hands shoulder-width distance apart. You can also walk your hands forward a few inches to deepen the stretch in your back. Hold this pose for 30 seconds to a minute, breathing deeply. To release the pose, bend your knees and come back to a hands-and-knees position.
Pigeon pose (Eka Pada Rajakapotasana)
This pose stretches the hip muscles and can be helpful for relieving lower back pain. To come into pigeon pose, start in a downward facing dog position. Bring your right knee forward towards your right hand and slide your right foot towards the left hand, coming into a lunge position with your right leg bent in front of you and your left leg extended behind you. Lower your hips towards the floor and rest your chest on your right thigh. You can keep your arms extended in front of you or bring them alongside your body with your palms facing down. You can also place a pillow or blanket under your hips for added support. Hold this pose for 30 seconds to a minute, breathing deeply. To release the pose, bring your hips back to a downward facing dog position and repeat on the other side.
The triangle pose (Trikonasana)
Stand with your feet about 3-4 feet apart, with your right foot turned out 90 degrees and your left foot turned in slightly. Extend your arms out to the sides so they are parallel to the floor, with your palms facing down.
As you exhale, bend at the waist to the right, reaching your right hand towards the floor beside your right foot. You can rest your hand on your ankle, shin, or the floor, depending on your flexibility. Extend your left arm towards the ceiling, keeping your shoulders and hips squared to the front. Gaze up at your left hand or towards the ceiling. Hold this pose for 30 seconds to a minute, breathing deeply.
To release the pose, bring your hand back to the starting position and repeat on the other side. It’s important to keep your hips and shoulders squared to the front as you bend to the side to avoid straining your lower back. You can also use a yoga block or a pillow under your hand for added support if needed. If you have any injuries or conditions that affect your balance, it’s a good idea to practice this pose near a wall for added stability.
The upward facing dog (Urdhva Mukha Svanasana)
This yoga pose stretches and strengthens the muscles in the upper body, including the arms, chest, and shoulders. It also helps to improve posture and can help relieve back pain. Here’s how to do the upward facing dog pose:
Start by lying on your stomach with your legs extended behind you and your palms flat on the floor beside your chest.
As you inhale, lift your head, chest, and legs off the floor and press down into your palms to lift your body even higher. Keep your legs and feet together and your elbows bent, with your hands shoulder-width distance apart. Gaze forward or slightly upwards, keeping your neck and spine extended.
Hold this pose for 30 seconds to a minute, breathing deeply.
To release the pose, lower your body back down to the floor and rest for a few breaths.
It’s important to keep your shoulders relaxed and down as you lift into the pose to avoid straining your neck and upper back. If you have any injuries or conditions that affect your back, it’s a good idea to practice this pose with caution and to listen to your body. You can also modify the pose by placing a pillow or blanket under your hips for added support.
The upward facing dog pose can be challenging, but practice can help improve your strength, flexibility, and posture. Remember to always listen to your body and stop any movements that cause pain or discomfort.